WebAssembly (WASM) ด้วยภาษา Zig
วันนี้เราจะมาลองเล่น WebAssembly (หรือที่เรียกสั้นๆว่า WASM) ด้วยภาษา Zig กัน เชื่อว่าหลายคนอาจจะเคยได้ยินชื่อ WASM กันมาบ้างแล้ว แต่ภาษา Zig อาจจะยังไม่คุ้นหูเท่าไหร่ ไม่เป็นไร เดี๋ยวเราจะไปทำความรู้จักแบบเข้าใจง่ายๆกัน

WebAssembly คืออะไร?
WebAssembly หรือ WASM เป็นรูปแบบโค้ด binary ที่สามารถทำงานได้บน web -browser ด้วยประสิทธิภาพที่ใกล้เคียงกับการรันโปรแกรมแบบ native บนเครื่องของเราเอง ช่วยให้เราสามารถเขียนโค้ดด้วยภาษาอื่นที่ไม่ใช่ JavaScript แล้วนำมาทำงานบนเว็บได้
สั้นๆ คือ WASM ช่วยให้เราสามารถเอาภาษาอื่นๆ ที่ไม่ใช่ JS มาทำงานบนเว็บได้นั่นเอง โดยข้อดีคือมันเร็วมาก เร็วกว่า JavaScript หลายเท่า!

ข้อดีของ WebAssembly

-
ความเร็วสูง — ทำงานได้เร็วใกล้เคียงกับ native code เพราะใช้ stack-based virtual machine มีการ compile ล่วงหน้า และมีการ optimize ที่ดี
-
ความปลอดภัย — มี sandbox ที่แข็งแกร่ง ทำงานใน memory space ที่แยกจากกัน มีการตรวจสอบ type ที่เข้มงวด และไม่สามารถเข้าถึงระบบโดยตรงได้
-
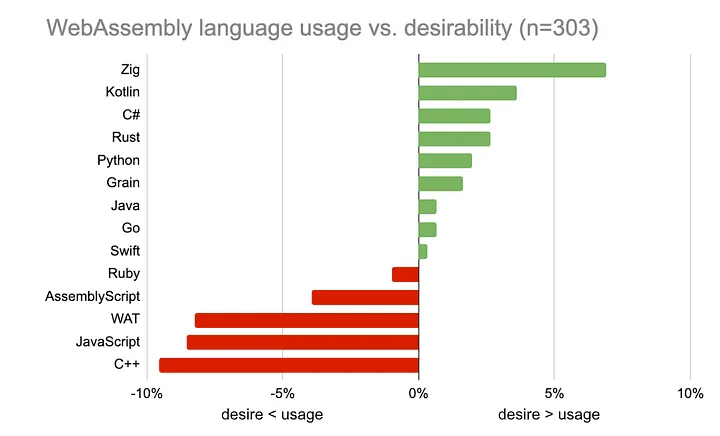
ความยืดหยุ่น — สามารถใช้ได้กับหลายภาษา เช่น C/C++, Rust, Zig และภาษาอื่นๆ ที่สามารถ compile เป็น WASM ได้
-
ขนาดเล็ก — โค้ดที่ได้มีขนาดเล็ก ใช้ binary format ที่กะทัดรัด มีการบีบอัดที่ดี และโหลดเร็วมาก
วิธีการทำงานของ WebAssembly

Compilation Process
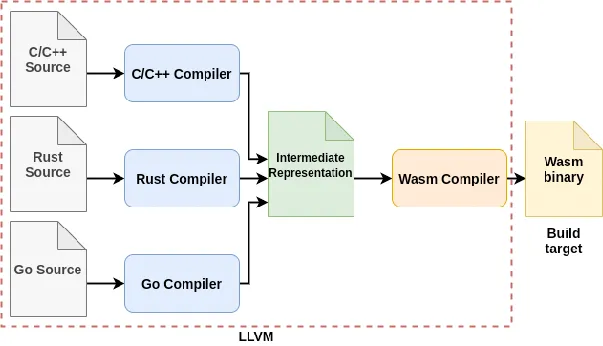
กระบวนการคอมไพล์ของ WebAssembly มีขั้นตอนดังนี้:
-
Source Code (Zig) — โค้ดที่เราเขียนด้วยภาษา Zig เป็นโค้ดที่มนุษย์อ่านเข้าใจได้
-
LLVM IR (Intermediate Representation) — เป็นรูปแบบกลางระหว่าง source code กับ machine code เป็นเหมือนภาษาเครื่อง ที่ถูกออกแบบมาให้ง่ายต่อการ optimize ช่วยให้ compiler สามารถทำการ optimize ได้ดีขึ้น
-
WebAssembly Binary — เป็นไฟล์ binary ที่คอมพิวเตอร์สามารถเข้าใจได้ มีขนาดเล็กกะทัดรัด ถูกออกแบบมาให้โหลดและ compile ได้เร็ว มีความปลอดภัยสูงเพราะทำงานใน sandbox
-
Browser — browser จะโหลดไฟล์ .wasm แปลงเป็น native code และรันโค้ดใน sandbox ที่ปลอดภัย
Execution Model
WebAssembly ทำงานด้วยโมเดลการทำงานที่ออกแบบมาให้มีประสิทธิภาพสูง:
-
Stack-based execution — ใช้ stack ในการจัดการข้อมูลและคำสั่ง เหมือนกับการวางของซ้อนกัน ข้อมูลที่เข้ามาล่าสุดจะถูกนำออกไปก่อน ทำให้การจัดการ memory มีประสิทธิภาพสูง
-
Linear memory model — หน่วยความจำถูกจัดเรียงเป็นเส้นตรง สามารถเข้าถึงได้ผ่าน pointer เหมาะกับการทำงานกับข้อมูลขนาดใหญ่ ทำให้การจัดการ memory เป็นไปอย่างมีระเบียบ
-
Type-safe operations — ทุกการดำเนินการต้องมีการตรวจสอบ type ป้องกันการทำงานกับข้อมูลผิดประเภท ช่วยให้โค้ดมีความปลอดภัยสูง ลดโอกาสเกิดข้อผิดพลาด
-
Deterministic execution — ผลลัพธ์ที่ได้จะเหมือนกันทุกครั้งที่ run ไม่มี side effects ที่ไม่คาดคิด ทำให้การ debug ง่ายขึ้น เหมาะกับการทำงานที่ต้องการความแม่นยำสูง
Memory Management
การจัดการหน่วยความจำของ WebAssembly ออกแบบมาให้มีประสิทธิภาพสูง:
-
Linear memory space — หน่วยความจำถูกจัดเรียงเป็นเส้นตรง สามารถเข้าถึงได้ผ่าน index เหมาะกับการทำงานกับข้อมูลขนาดใหญ่ ทำให้การจัดการ memory เป็นไปอย่างมีระเบียบ
-
32-bit addressing — ใช้ 32-bit ในการอ้างอิงตำแหน่งในหน่วยความจำ สามารถเข้าถึงหน่วยความจำได้ถึง 4GB เหมาะกับการทำงานส่วนใหญ่บนเว็บ ทำให้การจัดการ memory มีประสิทธิภาพ
-
Manual memory management — developer ต้องจัดการหน่วยความจำเอง โดยต้องจองและคืนหน่วยความจำอย่างถูกต้อง ทำให้โค้ดมีประสิทธิภาพสูง แต่ต้องระวังเรื่อง memory leak
-
No garbage collection — ไม่มีการจัดการหน่วยความจำอัตโนมัติ developer ต้องจัดการหน่วยความจำเอง ทำให้โค้ดทำงานได้เร็วขึ้น เหมาะกับการทำงานที่ต้องการประสิทธิภาพสูง
ตัวอย่างการทำงาน
สมมติว่าเรามีฟังก์ชัน add ใน Zig:
pub export fn add(a: i32, b: i32) i32 {
    return a + b;
}-
Compilation Process — โค้ด Zig จะถูกแปลงเป็น LLVM IR จากนั้นจะถูกแปลงเป็น WebAssembly binary และ browser จะโหลดไฟล์ .wasm ไป
-
Execution Model — เมื่อเรียกฟังก์ชัน add ค่า a และ b จะถูกวางบน stack และทำการบวกกัน ผลลัพธ์จะถูกส่งกลับไปให้ JavaScript
-
Memory Management — ตัวแปร a และ b จะถูกเก็บใน stack และไม่มีการจองหน่วยความจำเพิ่มเติม และไม่มีการคืนหน่วยความจำ ทำให้ทำงานได้อย่างมีประสิทธิภาพ
ภาษา Zig คืออะไร?

ข้อดีของภาษา Zig
-
No Hidden Control Flow — โค้ดของ Zig มีความคาดเดาได้ง่ายเพราะไม่มี exceptions, garbage collection หรือ runtime ที่ซ่อนอยู่ ทำให้การทำงานของโปรแกรมเป็นไปตามที่คิดไว้
-
Memory Safety — Zig ให้ความสำคัญกับความปลอดภัยของหน่วยความจำ โดยมีการจัดการหน่วยความจำแบบ manual ที่ developer สามารถควบคุมได้ มีตัวจองหน่วยความจำแบบเลือกได้ และมีการตรวจสอบความปลอดภัยของหน่วยความจำตอน compile ทำให้หลีกเลี่ยงปัญหาการใช้หน่วยความจำผิดพลาด
-
Performance — Zig ออกแบบมาให้มีประสิทธิภาพสูง ด้วย zero-cost abstractions และการคอมไพล์ที่มีประสิทธิภาพ ทำให้ได้ไฟล์ binary ขนาดเล็กและทำงานได้รวดเร็ว
-
Cross-Platform — Zig สามารถ compile ได้หลาย platform รวมถึง WebAssembly และมี cross-compilation ที่ดี ทำให้สามารถพัฒนาแอพพลิเคชันที่ทำงานได้บนหลาย platform
ทำไม Zig เหมาะกับ WebAssembly?

-
ขนาดเล็ก — Zig ไม่มี runtime และ dependencies ทำให้ไฟล์ .wasm ที่ได้มีขนาดเล็ก
-
ประสิทธิภาพสูง — Zig ให้การควบคุมหน่วยความจำที่ดี มีการ optimize ที่ดี ทำให้ทำงานได้เร็ว
-
ความปลอดภัย — มี type safety, memory safety และไม่มี undefined behavior
-
ง่ายต่อการเรียนรู้ — มี syntax เรียบง่าย และ documents ที่อ่านง่าย
มาลองสร้างโปรเจกต์กันเลย!
ขั้นตอนที่ 1. ตั้งค่าโปรเจกต์
- ก่อนอื่นเราต้องสร้างไฟล์
build.zigเพื่อใช้สำหรับการ compile
const std = @import("std");

pub fn build(b: *std.Build) void {
    const optimize = b.standardOptimizeOption(.{});

    const target = std.Target.Query{
        .cpu_arch = .wasm32,
        .os_tag = .freestanding,
    };

    const lib = b.addExecutable(.{
        .name = "zig-wasm",
        .root_source_file = .{ .cwd_relative = "src/main.zig" },
        .target = b.resolveTargetQuery(target),
        .optimize = optimize,
    });

    lib.entry = .disabled;
    lib.rdynamic = true;

    const install_step = b.addInstallArtifact(lib, .{});
    b.getInstallStep().dependOn(&install_step.step);
}
ขั้นตอนที่ 2. สร้างฟังก์ชันบวกเลขด้วยภาษา Zig
- สร้างโฟลเดอร์
srcและไฟล์main.zig
mkdir -p src- สร้างไฟล์
src/main.zig
pub export fn add(a: i32, b: i32) i32 {
    return a + b;
}

export fn _start() void {}
อธิบายโค้ด:
-
ฟังก์ชัน
add— สำหรับบวกเลขจำนวนเต็ม 2 ตัว และ return ผลลัพธ์เป็นเลขจำนวนเต็ม-
pub export— ทำให้ฟังก์ชันสามารถเรียกใช้งานจาก JavaScript ได้ -
a: i32, b: i32— รับตัวเลขจำนวนเต็ม 2 ตัวเป็น parameter (i32 = int 32 bits)
-
-
ฟังก์ชัน
_start— เป็นฟังก์ชันเริ่มต้นของ WebAssemblyvoid— ไม่มีการ return ค่ากลับ- เป็น empty function เพราะเราไม่ต้องการให้ทำอะไรตอนเริ่มต้น
ขั้นตอนที่ 3. สร้างหน้าเว็บสำหรับแสดงผล
- สร้างไฟล์
index.html
<!DOCTYPE html>
<html>
  <head>
    <title>Zig WebAssembly Demo</title>
    <style>
      body {
        font-family: Arial, sans-serif;
        max-width: 800px;
        margin: 0 auto;
        padding: 20px;
        background-color: #f5f5f5;
      }
      .container {
        background-color: white;
        padding: 20px;
        border-radius: 8px;
        box-shadow: 0 2px 4px rgba(0, 0, 0, 0.1);
      }
      .input-group {
        margin-bottom: 20px;
      }
      input {
        padding: 8px;
        margin-right: 10px;
        border: 1px solid #ddd;
        border-radius: 4px;
      }
      button {
        padding: 8px 16px;
        background-color: #007bff;
        color: white;
        border: none;
        border-radius: 4px;
        cursor: pointer;
      }
      button:hover {
        background-color: #0056b3;
      }
      .result {
        margin-top: 20px;
        padding: 10px;
        background-color: #e9ecef;
        border-radius: 4px;
      }
    </style>
  </head>
  <body>
    <div class="container">
      <h1>Zig WebAssembly Demo</h1>
      <p>This demo shows a simple add function implemented in Zig and compiled to WebAssembly.</p>

      <div class="input-group">
        <input type="number" id="num1" value="5" placeholder="First number" />
        <input type="number" id="num2" value="3" placeholder="Second number" />
        <button onclick="calculateSum()">Add Numbers</button>
      </div>

      <div class="result" id="result">Loading WebAssembly module...</div>
    </div>

    <script>
      let wasmInstance = null;

      async function init() {
        try {
          const response = await fetch('zig-out/bin/zig-wasm');
          const bytes = await response.arrayBuffer();
          const { instance } = await WebAssembly.instantiate(bytes);
          wasmInstance = instance;
          document.getElementById('result').textContent =
            'WebAssembly module loaded! Enter two numbers and click Add.';
        } catch (error) {
          console.error('Error loading WebAssembly:', error);
          document.getElementById('result').textContent =
            'Error loading WebAssembly module: ' + error.message;
        }
      }

      function calculateSum() {
        if (!wasmInstance) {
          document.getElementById('result').textContent = 'WebAssembly module not loaded yet!';
          return;
        }

        const num1 = parseInt(document.getElementById('num1').value) || 0;
        const num2 = parseInt(document.getElementById('num2').value) || 0;

        try {
          const sum = wasmInstance.exports.add(num1, num2);
          document.getElementById('result').textContent = `${num1} + ${num2} = ${sum}`;
        } catch (error) {
          document.getElementById('result').textContent = 'Error calculating sum: ' + error.message;
        }
      }

      init().catch(console.error);
    </script>
  </body>
</html>
ขั้นตอนที่ 4. สร้างเซิร์ฟเวอร์สำหรับใช้งาน
- สร้างไฟล์
server.py:
from http.server import HTTPServer, SimpleHTTPRequestHandler
import sys

class CORSRequestHandler(SimpleHTTPRequestHandler):
    def end_headers(self):
        self.send_header('Access-Control-Allow-Origin', '*')
        self.send_header('Access-Control-Allow-Methods', 'GET')
        self.send_header('Cache-Control', 'no-store, no-cache, must-revalidate')
        return super().end_headers()

    def do_OPTIONS(self):
        self.send_response(200)
        self.end_headers()

port = 8000
print(f"Starting server on port {port}...")
httpd = HTTPServer(('localhost', port), CORSRequestHandler)
try:
    httpd.serve_forever()
except KeyboardInterrupt:
    print("\nShutting down server...")
    sys.exit(0)
Source code: https://github.com/Supakornn/zig-wasm
วิธีการ Run โปรเจกต์
ขั้นตอนที่ 1. compile โค้ด Zig เป็น WebAssembly:
# ลบโฟลเดอร์ zig-out ถ้ามี
rm -rf zig-out

# compile โค้ด
zig build
ขั้นตอนที่ 2. start server:
python server.py
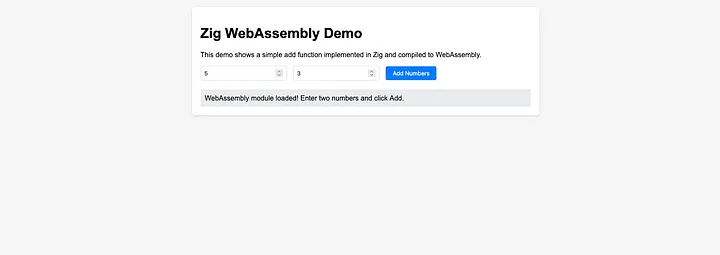
ขั้นตอนที่ 3. เปิด browser และไปที่ http://localhost:8000

การทำงานของโปรเจกต์
เมื่อเรารันคำสั่ง zig build สิ่งที่เกิดขึ้นคือ:
-
Parsing — อ่านโค้ด Zig และแปลงเป็น AST (Abstract Syntax Tree)
-
Semantic Analysis — ตรวจสอบ type ตรวจสอบความถูกต้องของโค้ด และตรวจสอบ memory safety
-
Code Generation — สร้าง LLVM IR optimize code และสร้าง WebAssembly binary
การทำงานของ WebAssembly ใน browser
เมื่อ browser โหลดไฟล์ .wasm:
-
Loading — โหลด binary file ตรวจสอบความถูกต้อง และจอง memory
-
Compilation — แปลงเป็น native code, optimize และ cache สำหรับการใช้ครั้งต่อไป
-
Execution — รันโค้ดใน sandbox จัดการ memory และติดต่อกับ JavaScript
การสื่อสารระหว่าง JavaScript และ WebAssembly
-
Import/Export — JavaScript ส่งค่าไปให้ WebAssembly และ WebAssembly ส่งผลลัพธ์กลับมา ทำงานผ่าน instance.exports
-
Memory Management — WebAssembly จัดการ memory ของตัวเอง โดย JavaScript สามารถเข้าถึง memory ได้ ผ่าน ArrayBuffer และมีการป้องกัน memory leaks
สรุปปปป!
WebAssembly เป็นเทคโนโลยีที่น่าสนใจมากๆ เพราะมันช่วยให้เราสามารถเขียนโค้ดที่ทำงานได้เร็วมากบน web-browser และภาษา Zig ก็เป็นตัวเลือกที่ดีสำหรับการเขียน WebAssembly เพราะโค้ดที่ได้จะเล็กและเร็วมาก อย่างไรก็ตามWebAssebly สามารถทำอะไรได้อีกมากมาย เช่น การสร้างเกมบนเว็บ, การประมวลผลข้อมูลจำนวนมาก และอื่นๆ หากสนใจก็ลองนำไปศึกษาเพิ่มเติมดูนะครับ!!